
308H.2 - Control Flow and Error Handling
Learning Objectives
By the end of this lesson, learners should be able to:
- Describe block and scope.
- Create conditional statements within JavaScript.
- Implement basic error handling with
try...catch. - Fix basic errors through browser debugging.
Setup
In order to participate in this lesson's examples and activities, let's look at the browser's developer console.
Open a web browser to a blank tab, and press F12 or Ctrl + Shift + I on Windows or ⌘ + ⌥ + I.
Alternatively, you can navigate to the developer tools using the menu bar on:
- Firefox: ➤ Web Developer ➤ Toggle Tools, or Tools ➤ Web Developer ➤ Toggle Tools
- Chrome: More tools ➤ Developer tools
- Safari: Develop ➤ Show Web Inspector. If you can't see the Develop menu, go to Safari ➤ Preferences ➤ Advanced, and check the Show Develop menu in menu bar checkbox.
- Opera: Developer ➤ Developer tools
You may have also accessed these tools during HTML and CSS lessons by using the "Inspect Element" option in the context menu.
For the purposes of this lesson, we'll be using the "Console" and "Sources" tabs within Chrome.
Note that you can type JavaScript code directly into the console, and it will execute!
-
Try this by typing something simple like
let x = 10 + 5and hitting enter.- The console will show "undefined" because the
letstatement does not return any values, it just declares them. - Try typing
xand hitting enter to see the value ofx.
- The console will show "undefined" because the
-
Now type
let y = x * 2and hit enter.- Type
yand hit enter to see the computed value. - Notice how the console remembers the value of
x?
- Type
- You can clear your console's memory by refreshing the page.
This gives you a simple way to test small snippets of JavaScript code without the need for a local or external file or development environment.
Code Blocks
A block statement is used to group zero or more statements. The block is delimited by a pair of braces ("curly brackets") and contains a list of zero or more statements and declarations. Beyond organizing code, code blocks have implications on the way the code within them is executed.
Blocks are typically paired with other JavaScript statements, such as conditionals (which we will cover next) or functions (which will be covered in a later lesson).
Blocks also have an effect on the way variables and other declarations can be accessed. This is referred to as "scope," which we will cover next.
Here is an example of a very simple block:
let x = 10;
let y = 5;

{
	let z = x + y;
	console.log(z);
}
You can copy and paste this entire piece of code into the browser development console to quickly test its behavior.
Scope
In general, the concept of scope in computer programming pertains to the accessibility of variables and functions from a given point of the code. In other words, as you write a line of code, what variables and functions do you have access to?
JavaScript has three types of scope:
- Global scope: The default scope for all code running in script mode.
- Module scope: The scope for code running in module mode.
- Function scope: The scope created with a function.
In addition, variables declared with let or const can belong to an additional scope:
- Block scope: The scope created with a pair of curly braces (a block).
In this lesson, we will discuss Global and Block scope. As you continue learning, identifying the scope behavior of modules and functions will be a simple task.
Why the Different Types of Scope?
There's a concept in programming known as The Principle of Least Access.
The principle is based on the idea that limiting the accessibility of variables (and functions) helps reduce bugs in the code - think of it as a form of "code security."
A practical benefit of having different scope, however, is being able to use the same names for variables in different blocks! If there were only one scope, this wouldn't be possible.
Global Scope
In our browsers, the global scope is represented by the window object. The window object is part of the Browser Object Model (BOM), which we will cover in a later lesson, but it is important to understand some key concepts now.
The window object is at the top of the scope chain, and its properties are available to everything we write.
It is generally bad form for our programs to create variables in the global scope. Doing so risks us overwriting data in use by JS libraries/frameworks or other routines.
Creating lots of global variables is referred to as "polluting the global scope," and we all know that it's not nice to pollute!
If we define a variable (or a function) within the global scope, it becomes a property on the window object. You can see this in action by typing var pollution = 'sucks' in the console, then type window. (don't forget the dot), scroll down and find the pollution we have created - yuck!
Although using
varin the global scope results in a global variable being created, interestingly, those created usingletandconstdo not appear as properties on thewindowobject. This is yet another benefit of usingletandconst; avoid global pollution!
Block Scope
Both let and const define variables that can only be accessed within the code block they are defined in.
A code block is created by using curly braces.
The following code modified from MDN's docs about let demonstrates differences between let and var:
{
  var x = 1;
  {
    var x = 2;  // same variable!
    console.log(x);  // 2
  }
  console.log(x);  // 2
}

{
  let x = 1;
  {
    let x = 2;  // different variable
    console.log(x);  // 2
  }
  console.log(x);  // 1
}
Notice how code blocks differentiate between segments of code, allowing us to organize variables and processes. As demonstrated, you can also nest code blocks within one another. Blocks and scope will become very important concepts as you continue to add to your programming repetoire, so make sure you understand the concepts thoroughly.
Examples of Scope
It is important to note that blocks have access to the set of variables and functions defined within their own scope AND in the outer scopes.
When a line of code accesses a variable or function, JavaScript will traverse up the scope chain until it finds what it is looking for.
Let's revisit our original block example:
let x = 10;
let y = 5;

{
	let z = x + y;
	console.log(z);
}
Here, the block has access to both x and y because they exist in the outer scope (in this case, the global scope).
If we layer our logic a bit more, we can also demonstrate how the scope chain accesses all outer scopes, not just the closest:
let x = 10;

{
	let y = 5;
	{
		let z = x + y;
		console.log(z);
	}
}
If the JS runtime engine gets to the global scope (which is the top of the scope hierarchy) and still can't find what it's looking for, that's when your program ceases due to a ReferenceError. We'll talk more about errors and how to handle them later in this lesson.
Here's an example of a ReferenceError. The console.log() statement does not have access to z in this example, because it is block scoped within a block that console.log is outside of:
let x = 10;

{
	let y = 5;
	{
		let z = x + y;
	}
	console.log(z);
}
Running this code will give us the error: Uncaught ReferenceError: z is not defined.
As we continue into this lesson, you will notice how blocks and scope interact with other statements, but keep in mind that the fundamentals are always the same.
Control Flow and Conditionals
In programming, conditionals perform different operations based on the given test parameters. There are many different types of conditionals, which are one of the most frequently-used tools for building scripts and program logic. Using conditionals in this way allows us to control the order in which JavaScript executes the statements in a script, a concept known as "control flow."
Code is typically run in order from the first line in a file to the last, unless the computer runs across structures that change the control flow, such as conditionals (and loops, which we will cover in the next lesson).
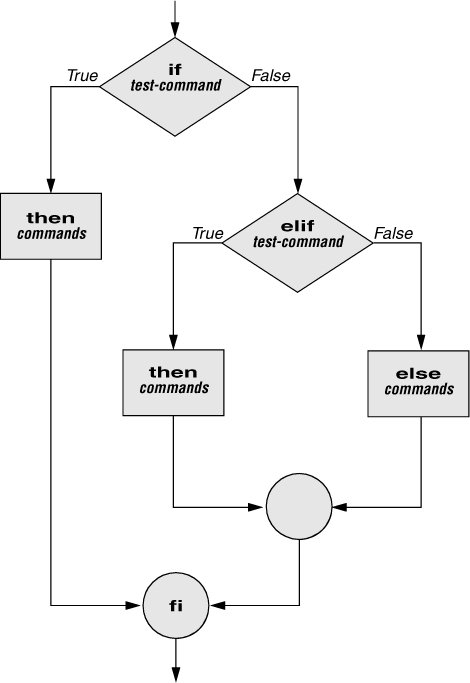
For example, this if...else conditional is used to test two conditions:
if (x == 10) {
  // do this
} else {
  // do this
}
if...else statements are just one type of conditional, but they are the most common. The syntax of an if...else statement is shown above; if the expression within the if portion evaluates to true, it will execute the block of code that follows. If it evaluates to false, it will execute the else portion.
You can also forgo the else entirely, and just test a single condition with if, as follows:
if (x = 10) {
	// do this
}
Notice how the code following the if and else statements is organized in blocks. These blocks are not necessary, but without them the if and else would only apply to a single line of code, rather than an entire block.
For example, the following code is valid:
let x = 5;

if (x > 0)
	console.log('Positive!');
else
	console.log('Negative.');
However, including multiple statements requires blocks. This is not valid:
let x = 5;

if (x > 0)
	console.log('Positive!');
	x++;
else
	console.log('Negative.');
	x--;
Attempting to run this code will result in SyntaxError: Unexpected token 'else'. This is because JavaScript is viewing the code like this:
let x = 5;

if (x > 0) {
	console.log('Positive!');
}

x++;

else {
	console.log('Negative.');
}

x--;
Unlike some other languages, simply indenting lines of code does not create blocks. Since you can't have an else without an attached if, the code runs into an error.
It is recommended to always include code blocks alongside statements that traditionally make use of them, like if...else. This makes code more readable, more maintainable, and more expandable.
"Truthy" and "Falsy"
In JavaScript, data type coercion happens automatically in many cases. Numbers can be directly added to strings, etc. This automatic conversion of one data type to another helps provide context to certain situations without the need for strict comparisons.
One of the most common examples of this is in comparisons and logic statements with conditionals.
A "truthy" value is any value that is considered true when it is encountered in a Boolean context, like within an if statement. All values are truthy unless they are defined as falsy, and the only falsy values are:
false0-00n""nullundefinedNaN
This means that statements like the following will execute the if block, because they are truthy:
if (42) {}
if ("0") {}
if ("false") {}
if (-42) {}
if (Infinity) {}
This also means, however, that you can use conditionals to check for the simple existance of a variable:
if (myVariable) {
	// if myVariable is undefined, it is treated as falsy
}

// instead of
if (typeof myVariable === "undefined") {}
Exercise
Open a code editor and create a file that will run some JavaScript code. Inside of the file:
- Declare a variable called
num. - Write a conditional statement that checks if the
numis positive or negative.
Once you have completed the above:
- Change the value of the variable.
- Save & open it again.
If you were tasked with setting up the security for a web site that only grants access to users over the age of 18, how would you write a conditional that gives users who are 18 or older access, and logs "Access Denied" for users who do not meet the given condition? Give it a try!
Nested if...else
You can test multiple conditions together by "nesting" if...else statements.
The structure of nested if...else looks like this:
if (true) {
	if (true) {
		// do this
	} else {
		// do this
	}
} else {
	//do this
}
You can also "chain" multiple if...else statements together; we call this else if.
if (x >= 10) {
	//do this
} else if (x <= 10>) {
	//do this
} else {
	//do this
}
Exercise
- Write a nested
if...elsestatement. - Declare a variable called
num. - Add an
if...elsestatement that checks ifnumis positive & greater than 100. - Add another statement that checks if
numis positive but less than 100. - Add a final statement to check if
numis negative.
Exercise
Write an if..else statement for the following requirements:
- If a learner gets 90 or higher:
console.log("A") - If a learner get 80 or above:
console.log("B") - If a learner get 70 or above:
console.log("C") - If a learner get 55 or above:
console.log("D") - Any grade lower than 55:
console.log("F")
Switch Statements
Another option for control flow is the switch statement.
The switch statement evaluates an expression, matching the expression's value to a case clause, and executes statements associated with that case, as well as statements in any case that follows the matching case.
For example:
let x = '0';
switch (x) {
   case '1':
       // do something...
       break;
   case '2':
       // do something...
       break;
   default:
       // do something...
       break;
}
A breakdown of the syntax for a switch statement is as follows:
- The
switchkeyword signifies the start of a switch statement. - A value needs to be provided between the parentheses, and this value can be in the form of a literal or variables.
- The
caseclause specifies what value theswitchargument can be. Both theswitchargument and itscasevalues must match in data type. - The
breakkeyword tells JavaScript to get out of the switch statement and not evaluate any othercase. Without thebreakkeyword, JavaScript will continue to execute othercaseclauses. - The
defaultkeyword is like theelsestatement. Best practice is to always use thedefaultkeyword forcasevalues that are invalid.
The example below simulates a simple calculator that can only perform four different arithmetic operations on two numbers.
let x = 5;
let y = 4;
let operand = "*";
switch (operand) {
   case "+":
       console.log(x + y);
       break;
   case "-":
       console.log(x - y);
       break;
   case "*":
       console.log(x * y);
       break
   case "/":
       console.log(x / y);
       break;
   default:
       console.log("Invalid Operand")
       break;
}
Notice that default is being used for the invalid case. Also, the break keyword is not needed in the default case; it depends on the style of the programmer to place the break keyword there.
Ternary Operators
The conditional (ternary) operator is the only JavaScript operator that takes three operands: a condition followed by a question mark (?), then an expression to execute if the condition evaluates to true, followed by a colon (:), and finally the expression to execute if the condition is false.
(conditional) ? (value_if_true) : (value_if_false)While this is technically an operator and not an element of control flow, this operator is frequently used as an alternative to an if...else statement.
For example, if we wanted to test whether a value was equal to 10, we could do the following:
let x = 10;
let isTen;

if (x == 10) {
	isTen = true;
} else {
	isTen = false;
}
Or, we could use a simple ternary operator to accomplish the same task in a less verbose manner:
let x = 10;
let isTen = x == 10 ? true : false;
Errors
We have mentioned a few errors that you might encounter, such as ReferenceError or SyntaxError. While these two errors are typically fixed within the source code itself, there are many types of errors that you could encounter that are outside of your control. This is particularly true when dealing with external servers or databases.
You can take a look at the MDN JavaScript error reference to see the errors that JavaScript can throw -- there are a lot of them, but some are much more common than others.
We can also create our own errors! This can be useful for a number of reasons, such as validating data before code execution, or simply moving to a different section of code under certain conditions without the need for many if...else statements.
We create our own errors throught the use of the throw statement. The throw statement stops execution of the current block of code (the statements after the throw will not be executed), and the program will terminate (unless... there's a catch. More on that later).
Here's an example where we throw the string "Error - I don't know what I'm doing."
let x = 10;

if (x < 0) {
	console.log("Negative!");
} else {
	throw "Error - I don't know what I'm doing.";
}

console.log("Does this log?");
Executing this code will give us Uncaught Error - I don't know what I'm doing. and no, "Does this log?" will not log.
Why is that? I thought we said only the current block of code will stop execution?
Yes, but we also said the program will terminate (unless... there's a catch). That's how we deal with uncaught errors, we catch them!
Try and Catch
The try...catch control flow statement helps us handle errors whenever they might appear. You will use these statements a lot when dealing with error-prone processes. While it is nice for us as developers to see errors so that we can debug our code, we don't want errors in production. Does that mean we need to make sure errors never occur? No, we just need to handle them properly.
The try block defines code to try. If an error is thrown within that block (either manually or by JavaScript), it will then execute the code within the catch block. There is also an optional finally block that will always be executed before control flow exits the try...catch construct.
Here's an example of this with our previous code:
let x = 10;

try {
	if (x < 0) {
		console.log("Negative!");
	} else {
		throw "Error - I don't know what I'm doing.";
	}
} catch (error) {
	console.log(error);
}

console.log("Does this log?");
The catch block accepts an argument that can be named whatever you'd like, but the error is passed into the catch block as this name. Here, we named it error, but you'll also commonly see it simply named e or err.
In this example, we simply log the error rather than having it thrown to the user. Running this code shows that this does in fact change the behavior of the program, as "Does this log?" does, in fact, log. Since the exception is caught and handled, the script is allowed to continue.
Most of the time, your error handling structures will be a bit more complex, and ensure that the error is properly processed and accounted for, not simply tossed to the side.
Here's slightly a more complex example:
let x = 10;

try {
	if (x > 0) {
		let isEven = (x % 2 == 0) ? true : false;
	} else if (x <= 0) {
		throw "Error - Value of 0 or below.";
	}

	console.log(isEven);
} catch (err) {
	console.log(err);
} finally {
	console.log(x);
}
What will be logged to the console in this example? Why?
Types of Errors
The most common types of errors are:
- Syntax Errors: errors within the spelling and grammar of your code that cause the program to stop working partially through (or not run at all). These types of errors are usually simple fixes as long as you know what you're looking for.
- Logic Errors: errors where the syntax is correct, but the logic behind the code is not what you inteded it to be. The program will run, but it will give incorrect results. These errors are much more difficult to debug, as there is no error thrown that directs you to the source of the error.
We've already encountered a syntax error in one of the previous examples. Let's look at that example again and examine the output in the Chrome devtools console:
let x = 5;

if (x > 0)
	console.log('Positive!');
	x++;
else
	console.log('Negative.');
	x--;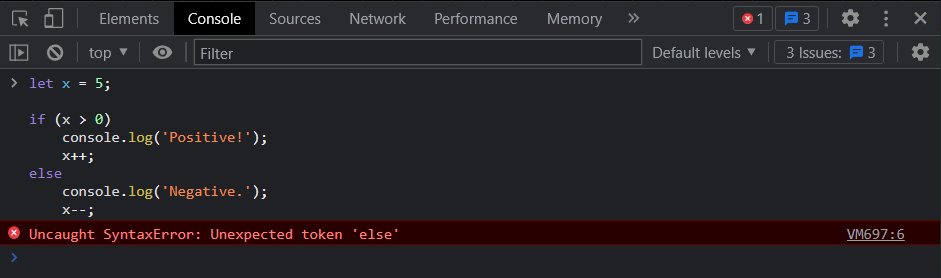
As expected, we see the SyntaxError alongside its message: "Unexpected token 'else'".
There is, however, another item on the same line: "VM697:6". This may be slightly different for you, but the important part is the same: :6 designates the line at which this error was encountered. VM697 is what would typically be the file name, but since we are running this code in the browser console, it is assigning that automatically.
Using this information, we can very quickly identify where syntax errors (and other types of errors) occur in our code. Imagine if we had thousands of lines of code across dozens of files, and we were given an error like "SyntaxError: Unexpected token '}'". We would spend days looking for that extra curly brace.
If we click on the VM697:6 link in the console, it will navigate us to the "Sources" tab and open a file viewer that has the syntax error marked for us. Convenient!
Logic errors are less easy to find, but thankfully this "Sources" tab makes it much easier to do so through a practice known as debugging.
Debugging
As we continue our example with debugging in Chrome, it is important to note that most code editors have options for native debugging and many other features. The process is similar if not identical across platforms. Research what might be available to you in order to increase your coding efficiency!
In order to explore debugging, we need to create a proper file to work through. Create an html file with the following contents:
<!DOCTYPE html>
<html lang="en">
<head>
    <meta charset="UTF-8">
    <meta http-equiv="X-UA-Compatible" content="IE=edge">
    <meta name="viewport" content="width=device-width, initial-scale=1.0">
    <title>Debugging Example</title>
</head>
<body>
    <script>
        let x = 10;
        let isEven;

        try {
            if (x > 0) {
                isEven = (x % 2 == 0) ? false : true;
            } else if (x <= 0) {
                throw "Error - Value of 0 or below.";
            }

            console.log(isEven);
        } catch (err) {
            console.log(err);
        } finally {
            console.log(x);
        }
    </script>
</body>
</html>
Here we have introduced a very simple, very easy to find logic error, but we'll use it to demonstrate debugging.
If we open this file in Chrome sources, we see the following:
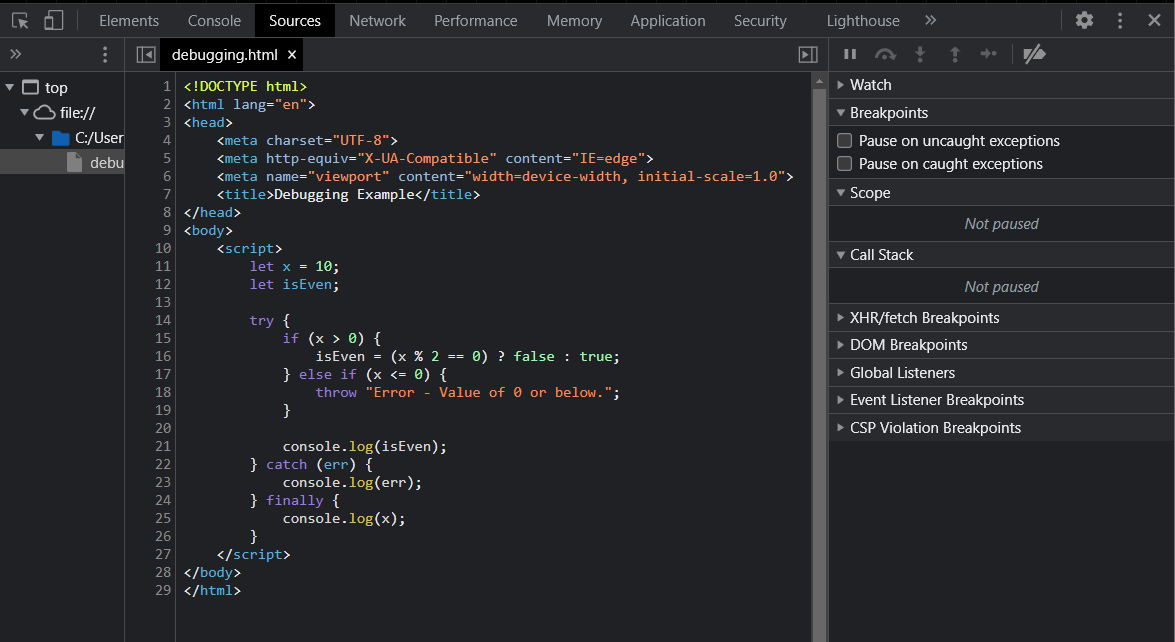
The key feature of a debugger is breakpoints. By clicking to the left of the line numbers in the file viewer, we can set breakpoints that will automatically pause execution of the script so that we can analyze the program at that moment in time and debug it.
While the code is paused, we can examine the current value of variables, execute commands in the console, and accomplish other tasks that will help us find whatever it is we're looking for. You can add and remove breakpoints, or temporarily disable them by using the "Breakpoints" list on the right of the Sources tab.
Chrome and other tools also allow for conditional breakpoints, which only trigger when a given expression is truthy.
With breakpoints set, we can refresh the page and see what happens. We can step through the program using the navigation buttons near the top right, or by using the shortcut key F9 on windows.
In this case, our logic error is within the line isEven = (x % 2 == 0) ? false : true, which simply sets its true and false values opposite of what they should be.
Another option for setting breakpoints is the debugger statement. The debugger statement acts like a breakpoint within the source code itself, and will pause execution of the program at the location of the statement.
For example, we could set a breakpoint in our script like so:
let x = 10;
let isEven;

try {
	if (x > 0) {
		isEven = (x % 2 == 0) ? false : true;
		debugger;
	} else if (x <= 0) {
		throw "Error - Value of 0 or below.";
	}

	console.log(isEven);
} catch (err) {
	console.log(err);
} finally {
	console.log(x);
}
All of these tools will grow in usefulness as your repetoire expands and your programs become more complicated. Take a look through the other options within the Sources tab and make a mental note of things you may want to explore with it in the future!
Break and Continue
There are three remaining control flow statements to discuss, one of which we have already touched on.
The break statement can be used with switch statements to terminate the statement and transfer program control to the statements that follow. It can also be used within loops to terminate execution of the loop.
Likewise, the continue statement can be used to terminate the current iteration of a loop and move onto the next iteration, skipping any code that remains within the loop's current iteration.
Make sense? It shouldn't, yet. We'll be covering loops and iteration in the next lesson, and discussing how break and continue interact with loops in more detail. For now, it is important to know that these are also control flow statements, and therefore relevant to this lesson.
Return
The final control flow statement is another one that we won't put to practice for a couple of lessons. The return statement is used with functions, which allow us to "package" code into more manageable, reusable parts. The return statement basically says, "hey, you asked us to do something, here's the result of that something" and hands that result back to the remainder of the program.
Again, we'll cover this in more detail when we talk about functions.