
Lesson 308H.14 - Form Validation
Learning Objectives
By the end of this lesson, learners will be able to:
- Validate a form using built-in HTML validation attributes.
- Create regular expressions to match strings to specified patterns.
- Use JavaScript functions to validate form input based on custom logic.
CodeSandbox
This lesson uses CodeSandbox as one of its tools.
If you are unfamiliar with CodeSandbox, or need a refresher, please visit our reference page on CodeSandbox for instructions on:
- Creating an Account
- Making a Sandbox
- Navigating your Sandbox
- Submitting a link to your Sandbox to Canvas
Form Validation
Form validation is the process of ensuring that user input matches the desired parameters before that input is handled by associated functions.
HTML has built-in client-side form validation to validate user data with the following attributes:
required– Specifies whether a form field needs to be filled in before the form can be submitted.minlengthandmaxlength– Specifies the minimum and maximum length of textual data.minandmax– Specifies the minimum and maximum values of numerical input types.type– Specifies whether the data needs to be a number, an email address, or some other specific preset data type.pattern– Specifies a regular expression that defines a pattern the entered data needs to follow.
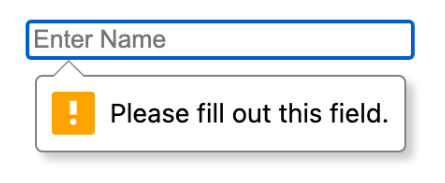
The boolean required attribute, if present, indicates that the user must specify a value for the input before the owning form can be submitted.
The required attribute is supported by text, search, url, tel, email, password, date, month, week, time, datetime-local, number, checkbox, radio, and file, <input> types, along with the <select> and <textarea> form control elements. If present on any of these input types and elements, the :required CSS pseudo-class will match. If the attribute is not included, the :optional CSS pseudo-class will match.
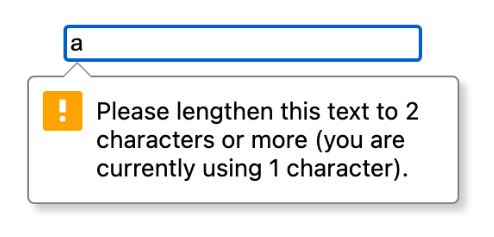
The minlength attribute defines the minimum number of characters (as UTF-16 code units) the user can enter into an <input> or <textarea>. This must be an integer value of 0 or higher. If no minlength is specified, or an invalid value is specified, the input has no minimum length.
This value must be less than or equal to the value of maxlength; otherwise, the value will never be valid, as it is impossible to meet both criteria.
The maxlength attribute defines the maximum number of characters (as UTF-16 code units) the user can enter into an <input> or <textarea>. This must be an integer value of 0 or higher.
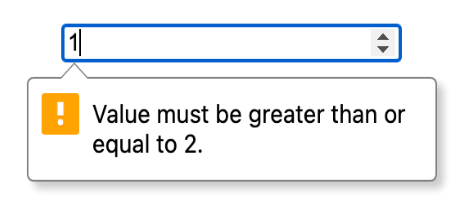
The min attribute defines the minimum value that is acceptable and valid for the input containing the attribute. If the value of the element is less than this, the element fails constraint validation. This value must be less than or equal to the value of the max attribute.
The max attribute defines the maximum value that is acceptable and valid for the input containing the attribute. If the value of the element is greater than this, the element fails constraint validation. This value must be greater than or equal to the value of the min attribute.
It is valid for the input types date, month, week, time, datetime-local, number, and range, as well as the <meter> element.
How each <input> element works varies considerably depending on the value of its type attribute.
Take a few minutes to explore the MDN reference on input types. Scroll through these and interact with the examples to obtain an understanding of how each type works.
Pattern Attribute and Regular Expressions
The final validation attribute, pattern, is deserving of its own section as it leads us to the topic of regular expressions.
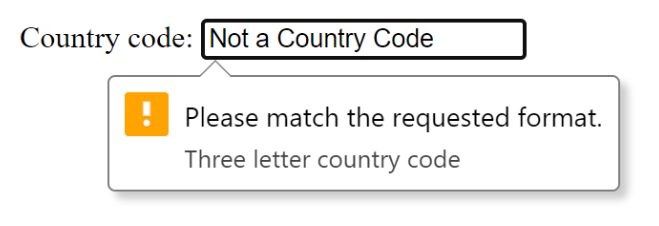
The pattern attribute specifies a regular expression the form control's value should match. If a non-null value does not conform to the constraints set by the pattern value, the ValidityState object's read-only patternMismatch property will be true.
Using the title attribute in conjunction with the pattern attribute will let you achieve a custom message to help users identify what is expected for the current input. Without a title attribute or the appropriate type attribute, your input requirements could be difficult to understand.
Regular expressions are patterns used to match character combinations in strings. In JavaScript, regular expressions are also objects.
These patterns are used with the exec() and test() methods of RegExp, and with the match(), matchAll(), replace(), replaceAll(), search(), and split() methods of String.
There are two ways to create regular expressions: by using a regular expression literal, which consists of a regular expression pattern enclosed between forward slashes; or by calling the constructor function of the RegExp object.
// Create a regular expression using a literal.
const re = /ab+c/;
// Create a regular expression using the RegExp constructor.
const re2 = new RegExp("ab+c");
Regular expressions can be complex to construct and difficult to understand at a glance. They are composed of sets of characters and symbols that, when put in sequence, describe a specific pattern.
Here's a brief overview which can serve as a cheat sheet of sorts:
Character Classes
.- any character except newline\w \d \s- word, digit, whitespace\W \D \S- not word, not digit, not whitespace[abd]- any of a, b, or c[^abc]- not a, b, or c[a-z]- character between a and z
Anchors
^abc$- start (^) or end ($) of a string\b \B- word, not-word boundary
Escaped Characters
\. \* \\- escaped special characters\t \n \r- tab, linefeed, carriage return
Groups and Lookaround
(abc)- capture group\1- backreference to group #1(?:abc)- non-capturing group(?=abc)- positive lookahead(?!abc)- negative lookahead
Quantifiers and Alternation
a* a+ a?- 0 or more, 1 or more, 0 or 1a{5} a{2,}- exactly five, two or morea{1,3}- between one and threea+? a{2,}?- match as few as possibleab|cd- match ab or cd
This likely looks like gibberish, so let's put it to work with a few examples that might help.
Exercise
We're going to use the RegexLearn interactive Regex 101 tutorial to help facilitate this. This tutorial will provide descriptions of each step you are accomplishing, as well as an interactive input field for your regex that displays its matches in real-time using the text above it.
You will have about twenty minutes to work through this, but your instructor may give you more or less time depending on your class's needs. If you get stuck on a particular problem for too long, don't be afraid to look at the answer! Once you have seen the answer, though, try to understand why it works that way. Don't worry if you don't finish the entire tutorial; you can always come back to it later.
You can choose to complete these tasks in the embed below or on the original site.
Note that RegexLearn also has a handy cheatsheet of their own, as well as a regex playground.
There are many other tools out there for helping to learn, understand, and master regex. Here are a few:
- RegExr - An online tool to learn, build, and test regular expressions, with the ability to see what portions of text match the expressions in real time. Includes a visual representation of the regex statement.
- Regex 101 - A tool to create and test regular expressions, with a built-in display of matching information as well as an explanation section to elaborate upon how the regex works.
- ExtendsClass Regex Tester - Another visual regex tester with a different method of displaying results.
Regex Form Validation
Now that we understand a bit about how regex works, let's take a look at an example that makes use of the <input> element's pattern attribute.
Interact with the sandbox below and examine its code. Look at how the pattern attribute is being used, and what the regex values are attempting to accomplish. Try entering data into the form to observe the results.
A breakdown of the code will follow the embed.
Let's first look at the below <input> element:
<input
    type="text"
    name="Name"
    placeholder="Enter a Username"
    pattern="^[a-zA-Z]+"
    title="Please start your username with a letter from a-z."
    required
    />
The above input element has a type attribute of “text” and a pattern attribute with a regular expression value of ^[a-zA-Z]+.
^matches the beginning of the string, or the beginning of a line if the multiline flag is enabled.+matches the previous token ([a-zA-Z]) one or more times, as many times as possible.a-zmatches a single character in the range between a (index 97) and z (index 122) (case sensitive).A-Zmatches a single character in the range between A (index 65) and Z (index 90) (case sensitive).
This is a very simple regular expression. The email input, however, includes a much more complex pattern:
<input
    type="text"
    name="Email"
    placeholder="Email with regEx"
    title="Please start your email with a letter and follow the format name@mail.com"
    pattern="^\w+([.-]?\w+)*@\w+([.-]?\w+)*(\.\w{2,3})+$"
    required
    />
This input has a type attribute of text and a pattern attribute with a regular expression value of ^\w+([.-]?\w+)*@\w+([.-]?\w+)*(\.\w{2,3})+$. This is far too complex of an expression to analyze in one chunk, so we will break it down into its individual capturing groups and the tokens that modify them:
^\w+([.-]?\w+)*@\w+([.-]?\w+)*(\.\w{2,3})+$
The first section, ^\w+, looks for any number of consecutive word characters at the beginning of the string.
^matches the beginning of the string.\wmatches any word character (equivalent to[a-zA-Z0-9_]).+matches the previous token one or more times, as many times as possible.
The second section, ([.-]?\w+)*, looks for an instance of . or - zero times or once, followed by any word character one or more times. It then attempts to match that pattern zero or more times. This allows for dots and slashes to appear in an email address, but not more than once in a row.
- Looking for a character in the list
[.-]. ?matches the previous token zero times or once.\wmatches any word character.+matches the previous token one or more times, as many times as possible.*matches the previous token zero or more times, as many times as possible.
The third section, @\w+, looks for an @ symbol followed by any number of consecutive word characters, as described in section one.
The fourth section, ([.-]?\w+)*, is identical to the second section, looking for dots and slashes between words.
The fifth section, (\.\w{2,3})+$, looks for an instance of ., followed by any word character two or three times. It then attempts to match that pattern one or more times at the end of the string. This checks for the end of an email domain, such as “example.com.”
- Looking for the character
.(escaped via a backslash). \wmatches any word character.{2,3}matches the previous token two or three times.+matches the previous token one or more times, as many times as possible.$matches the end of the string.
Note that there are a few domains that end with more than three characters, such as ".travel" or even ".domains". How would we edit the regex above to accept these domains?
All of this validation can be simplified by simply using <input type="email">, which has built-in validation to guide the user toward providing a correct email address, including custom validation messages. That being said, regex allows for more custom pattern matching and increased flexibility when desired, whether dealing with an email or any other type of input data.
Form Element Events
We have previously discussed event handling in the context of various HTML elements, but forms have some specific events that they emit.
The <form> element and the <input> element can have JavaScript functions tied into them via the elements’ oninput, onchange, and onsubmit attributes. This enables validation in different contexts and at different times during the form submission process.
oninput– Fires every time the value of an<input>,<select>, or<textarea>element has been changed. For example, each time an individual character of a longer string is typed into a text input, this event fires.onchange– Fires when the value of an<input>,<select>, or<textarea>element has been changed, but only when the change has been completed and committed. For example, when a string is finished being typed into an input and the user moves to the next field, this event fires.onsubmit– Fires when the user submits the form through the use of a submit button or by pressing enter. Theonsubmitevent fires only on the<form>element itself, and not on any<input>or<button>element inside it.
You can also access these events through the addEventListener() method, which is considered best practice.
Exercise
In order to demonstrate how JavaScript can be used to enhance form validation, we're going to walk through a small example together. Fork this CodeSandbox and follow along inside of index.js as we continue.
References to the HTML elements we will be working with have already been provided for you.
First, we're going to create a function validateEmail() that handles these two simple rules:
- An email address must contain at least an @ sign and a dot (.).
- The @ sign must not be the first character of the email address, and the last dot must at least be one character after the @ sign.
function validateEmail(evt) {
  let emailVal = email.value;

  const atpos = emailVal.indexOf("@");
  const dotpos = emailVal.lastIndexOf(".");

  if (atpos < 1) {
    alert(
      "Your email must include an @ symbol which must not be at the beginning of the email."
    );
    email.focus();
    evt.returnValue = false;
    return false;
  }

  if (dotpos - atpos < 2) {
    alert(
      "Invalid structure: @.\nYou must include a domain name after the @ symbol."
    );
    email.focus();
    evt.returnValue = false;
    return false;
  }

  evt.returnValue = true;
  return emailVal;
}
Don't forget to bind this event to your form through the submit event listener!
Test the email input to see how it is working.
Now, we're going to abandon some of that code and incorporate validateEmail into a larger function that validates all of our form components. Remove the evt argument and all evt.returnValue references, and unbind validateEmail from the form element.
First let's build out the skeleton of our validate() function:
form.addEventListener("submit", validate);

function validate(evt) {
  const nameVal = validateName();
  if (nameVal === false) {
    evt.returnValue = false;
    return false;
  }

  const emailVal = validateEmail();
  if (emailVal === false) {
    evt.returnValue = false;
    return false;
  }

  const zipVal = validateZip();
  if (zipVal === false) {
    evt.returnValue = false;
    return false;
  }

  const countryVal = validateCountry();
  if (countryVal === false) {
    evt.returnValue = false;
    return false;
  }

  const passwordVal = validatePassword();
  if (passwordVal === false) {
    evt.returnValue = false;
    return false;
  }

  alert(`Name: ${nameVal}
Email: ${emailVal}
Country: ${countryVal}
Zip Code: ${zipVal}
Password: ...that's a secret.`);

  return true;
}
That's a lot of functions we need to build! Luckily, most of them are going to be very simple. Organizing our code in this way allows us to expand upon these features in the future, should we choose to do so. We could call validateName() on a change event rather than form submission, for example, and add additional functionality inside of each validation function without the need to change validate().
validateName() is just going to make sure that a name exists. Any name will work! Remember, some of these validation options can be very easily included in the HTML through things like the required attribute, but we are using this as a tool to demonstrate how JavaScript can interact with form validation.
function validateName() {
  if (name.value === "") {
    alert("Please provide a name.");
    name.focus();
    return false;
  }
  return name.value;
}
Wait! Do we ever check for an empty email? Let's go back and add that to our validateEmail() function. Here's what it should look like at this point:
function validateEmail() {
  let emailVal = email.value;

  if (emailVal === "") {
    alert("Please provide an email.");
    email.focus();
    return false;
  }

  const atpos = emailVal.indexOf("@");
  const dotpos = emailVal.lastIndexOf(".");

  if (atpos < 1) {
    alert(
      "Your email must include an @ symbol which must not be at the beginning of the email."
    );
    email.focus();
    return false;
  }

  if (dotpos - atpos < 2) {
    alert(
      "Invalid structure: @.\nYou must include a domain name after the @ symbol."
    );
    email.focus();
    return false;
  }

  return emailVal;
}
Our validatePassword() function is going to look a lot like validateName() for now.
function validatePassword() {
  if (password.value === "") {
    alert("Please provide a password.");
    password.focus();
    return false;
  }
  return password.value;
}
We will repeat this pattern for validateCountry(), which also needs to check that we've selected something other than the default value. Luckily, we've set the default value to an empty string, so this is exactly the same!
function validateCountry() {
  if (country.value === "") {
    alert("Please provide a country.");
    country.focus();
    return false;
  }
  return country.value;
}
Lastly, let's add validateZip() to handle the case of an empty zip code, as well as ensuring that zip codes are made out of five consecutive numbers.
function validateZip() {
  if (zip.value === "") {
    alert("Please provide a zip code.");
    zip.focus();
    return false;
  }

  if (zip.value.length !== 5 || isNaN(Number(zip.value))) {
    alert("Zip codes must be in the format #####.");
    zip.focus();
    return false;
  }

  return zip.value;
}
Test it out! At this point, our validation functions should cover everything we've set out to do thus far.
This is all relatively simple, though. If we wanted to, we could add password requirements, accepted zip code ranges based on selected country, and numerous other validation options that would be difficult if not impossible to implement without using JavaScript.
Give it a shot! Take a few minutes to add some password validation, such that the user's password must contain at least one special character, one uppercase letter, and one number. Use JavaScript, but ask yourself - could this be accomplished using regex? (Also, remember you can use regex within JavaScript; it is not just a function of the pattern attribute!)
Creating a Validated Form
Now that you've been through the basics, we're going to set you free to validate a form in your own way.
Navigate to ALAB 308H.14.1 - Form Validation and accomplish the tasks listed there.