
320H.4 - Thinking in React
Learning Objectives
By the end of this lesson, learners will be able to:
- Describe the "Thinking in React" philosophy.
- Use the five-step process provided by the React team to build a React application from scratch.
- Explain what type of data should be used as "state" and what shouldn't.
CodeSandbox
This lesson uses CodeSandbox as one of its tools.
If you are unfamiliar with CodeSandbox, or need a refresher, please visit our reference page on CodeSandbox for instructions on:
- Creating an Account
- Making a Sandbox
- Navigating your Sandbox
- Submitting a link to your Sandbox to Canvas
Thinking In React
When building websites with different frameworks, you should approach how you build them differently. With pure HTML and JavaScript, building a webpage is a much different process than it is with React. Likewise, other front-end frameworks require their own unique approaches in order to most efficiently build applications.
For this purpose, the React team provides us with "Thinking in React" as a guideline.
Thinking in React is a concept developed by the React team to help web developers build user interfaces (UI) more efficiently. It is a component-based approach that focuses on breaking down UI elements into small, reusable components. This allows developers to break down complex tasks into individual, simple parts that can be reused as needed. The main idea behind Thinking in React is to think of the UI as a set of components, or small pieces, that can be moved around, modified, and reused.
Thinking in React requires developers to break down an application into smaller components, each of which has its own state. State is data that is stored within a component, such as a user’s name or what items are in their shopping cart. By breaking down an app into smaller components, developers can more easily manage application state and make sure that updates only affect the component that needs updating.
The Thinking in React approach also encourages developers to use one-way data flow. This means that data flows from parent components to child components, rather than from child components to parent components. This helps keep components independent and makes it easier to debug and maintain an application.
Here are the steps to take when building a React application, according to the "Thinking in React" principles:
- Break your user interface into components.
- Build a static version of the application using React.
- Find the simplest complete representation of the UI state.
- Identify where the state should "live" - which component should "own" it.
- Add inverse data flow, where necessary.
We will walk through each of these steps with examples adapted from the React documentation, so you can see how an application starts and evolves throughout development.
Step 0: Start with a Mockup
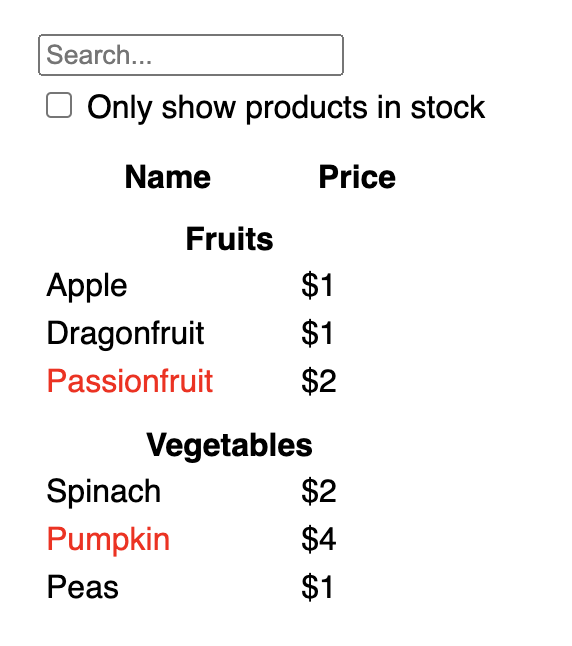
More often than not, you will start your applications with a mockup that you have either made yourself or received from a designer. You will likely also be given a dataset from an API that you are instructed to work with.
For the purposes of our examples, here are the data and mockup starting points:
[
  { category: "Fruits", price: "$1", stocked: true, name: "Apple" },
  { category: "Fruits", price: "$1", stocked: true, name: "Dragonfruit" },
  { category: "Fruits", price: "$2", stocked: false, name: "Passionfruit" },
  { category: "Vegetables", price: "$2", stocked: true, name: "Spinach" },
  { category: "Vegetables", price: "$4", stocked: false, name: "Pumpkin" },
  { category: "Vegetables", price: "$1", stocked: true, name: "Peas" }
]
Now that we know where to start, we can begin breaking this mockup down into individual components.
Step 1: Establish a Component Heirarchy
The simplest way to determine what components your application needs is to draw boxes to group components on the mockup itself, and give them names! Sometimes, mockups will already come with this information available, saving us a bit of time.
When determining what each component contains, think about the following:
- Each component should (ideally) only do one thing. If a component has multiple functions, consider breaking it down into smaller subcomponents.
- Components often align with CSS class selectors; if you have many elements you would style with a
list-itemclass, perhaps you need aListItemcomponent. - Consider how you would organize design layers in HTML; anything that gets repeated is likely a component.
Likewise, well-structured data from an API will often map directly to the structure of your components, because UI and data models often share the same information architecture. In general, each component should match one piece of your data model (at most, with some exceptions).
Here's how the example mockup breaks down:
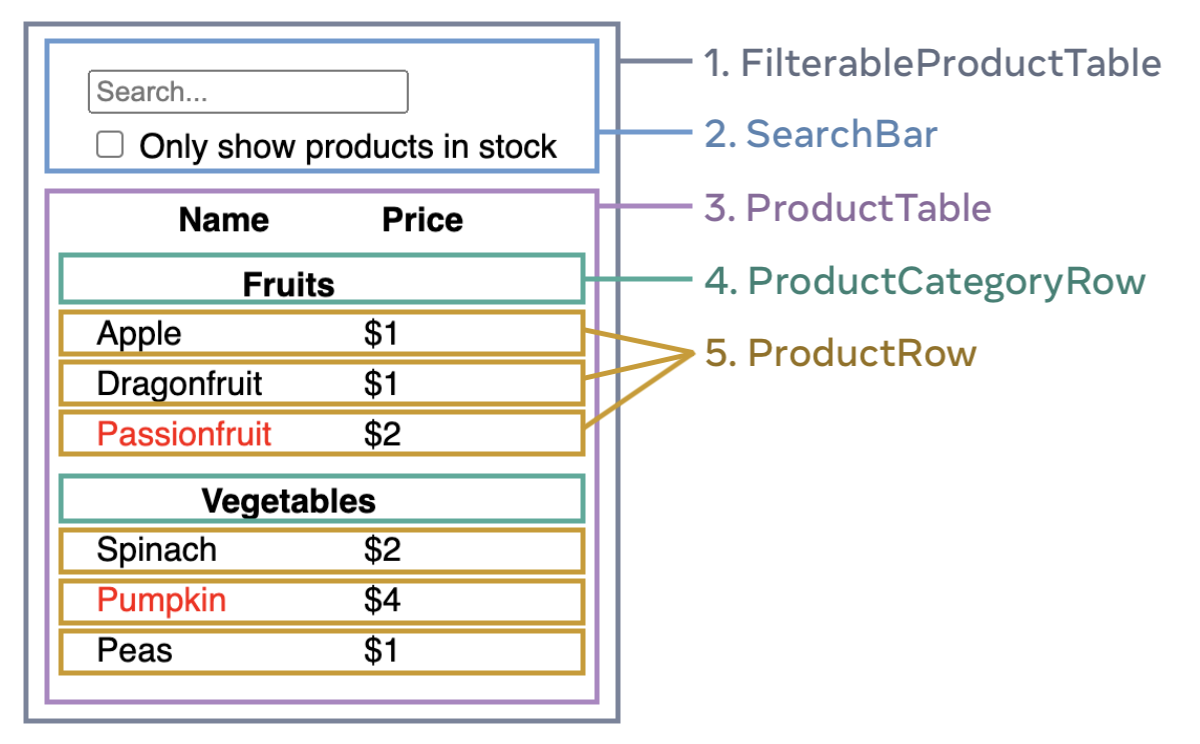
FilterableProductTable(grey) contains the entire app.SearchBar(blue) receives the user input.ProductTable(lavender) displays and filters the list according to the user input.ProductCategoryRow(green) displays a heading for each category.ProductRow(yellow) displays a row for each product.
In this case, we have not defined a separate component for the ProductTable header containing "Name" and "Price" because it is very simple. If the header were to expand in complexity and incorporate additional functionality such as searching or filtering, it would likely need to become its own component.
The component heirarchy is built simply by listing which components are nested inside of one another in a simple nested list:
-
FilterableProductTableSearchBar-
ProductTableProductCategoryRowProductRow
Step 2: Build a Static Layout in React
As a general rule of thumb, building static layouts requires a lot of typing and not much thinking, and adding interactivity requires a lot of thinking but not much typing. Starting with a static layout allows you to make sure your components are what they need to be, where they need to be, and how they need to be before you start complicating them with the wiring that enables interactivity.
How you approach building the static layout depends on the scale of the project and your personal preferences. In small-scale projects, it's typically easiest to work top-down, starting with the "parent" components and working your way down to the children. In larger projects, it becomes easier to do the reverse.
In this example, we'll build out our products all at once so that you can decide how you would have approached it after seeing the final result. When learning a new concept or a new way to approach a problem, it is often useful to start with the solution and work your way backwards to see how it was done. This makes it easier to do it yourself the next time you encounter something similar!
This learning technique is called "retrograde analysis," and can be helpful in many aspects of life, not just programming!
You will notice that we have done some of the "wiring" between components by passing props to many of our components. This is still considered a static layout, because the data that we are working with is unchanging, and user interaction has no effect. We are simply using the data we have been initially given to populate our components' initial state.
The flow of data in this static application is one-way, from the top of the component heirarchy to the bottomw. This one-way data flow is at the core of React's design, and helps prevent bugs and make behavior more obvious.
Now that we have a reusable library of components for our small application, we can examine their state and implement some interactivity.
Step 3: Find the Minimal State Representation
Finding the minimal necessary state representation is extremely important to prevent repeating yourself (remember DRY?). Anything your user interface doesn't need can be computed on-demand, and doesn't need to be stored in state.
For example, if you have a list of learners in a state array, and want to know how many of those learners belong to the React course, you should not store that information in another piece of state. Instead, it should be calculated from the existing learners state.
Here are the pieces of user interface data within the example application:
- The original list of products.
- The search text the user has entered.
- The value of the checkbox.
- The filtered list of products.
Which of these are pieces of state? If the answer to any of these questions is "yes," then it is not state.
- Does it remain unchanged over time?
- Is it passed in from a parent via props?
- Can you compute it based on existing state or props in your component?
Anything that is left is probably state.
Going through our iterface data one by one:
- The original list of products is passed in as props, so it’s not state.
- The search text seems to be state since it changes over time and can’t be computed from anything.
- The value of the checkbox seems to be state since it changes over time and can’t be computed from anything.
- The filtered list of products isn’t state because it can be computed by taking the original list of products and filtering it according to the search text and value of the checkbox.
In this case, we only have two pieces of state to work with: the search text and the value of the checkbox.
Step 4: Identify where State Should Live
Now we need to determine which component owns each piece of state and is responsible for changing it. Due to the way React passes props down the component heirarchy, it may not be immediately clear which component should own what state (remember the "lifting state" pattern and prop drilling concepts from an earlier lesson?).
The React team provides us with some steps to help identify where state belongs! For each piece of state:
- Identify every component that renders something based on that state.
- Find their closest common parent component — a component above them all in the hierarchy.
-
Decide where the state should live:
- Often, you can put the state directly into their common parent.
- You can also put the state into some component above their common parent.
- If you can’t find a component where it makes sense to own the state, create a new component solely for holding the state and add it somewhere in the hierarchy above the common parent component.
In the example application we're building, the two pieces of state we have identified (search text and checkbox value) always live together, so they will likely appear in the same place. Let's take a look at where they should end up using the strategy outlined above:
-
Identify components that use state:
ProductTableneeds to filter the product list based on that state.SearchBarneeds to display that state.
- Find their common parent: The first parent component both components share is
FilterableProductTable. - Decide where the state lives: We’ll keep the filter text and checked state values in
FilterableProductTable.
So the state values will live in FilterableProductTable.
Now, we'll use the useState hook to add the two pieces of state:
function FilterableProductTable({ products }) {
  const [filterText, setFilterText] = useState('');
  const [inStockOnly, setInStockOnly] = useState(false);
  // ... continued
And we will pass these state variables as props to our SearchBar and ProductTable:
<div>
  <SearchBar
    filterText={filterText}
    inStockOnly={inStockOnly} />
  <ProductTable
    products={products}
    filterText={filterText}
    inStockOnly={inStockOnly} />
</div>
We'll also use these state values within the SearchBar and ProductTable components to define some of their behavior.
Here's where we're at so far:
You'll notice within the console that we're getting an error. React is warning us that we've populated the values of our input fields, but there is no way to handle changes to those inputs! If you attempt to type in the search bar or check the checkbox, nothing happens. This is because we still need to add event handlers that update our state.
Adding "inverse data flow," data that flows from the components being interacted with up the heirarchy to the component that owns the state, is the next step of building our application.
Step 5: Add Inverse Data Flow
One of the benefits of React is that is makes its data flow explicit, meaning it will always be easy to determine how data is being handled, transferred, or changed. It does, however, mean that two-way data binding requires a bit of extra typing compared to using some other platforms (or React libraries).
In the example above, React ignores your input. This is intentional. By writing <input value={filterText} />, we've set the value prop of the input to always be equal to the filterText state passed in from FilterableProductTable. Since filterText state is never set, the input never changes.
In order to allow the individual input elements to change the state that is owned in their parent, we need to pass the set functions down as props:
function FilterableProductTable({ products }) {
  const [filterText, setFilterText] = useState('');
  const [inStockOnly, setInStockOnly] = useState(false);

  return (
    <div>
      <SearchBar
        filterText={filterText}
        inStockOnly={inStockOnly}
        onFilterTextChange={setFilterText}
        onInStockOnlyChange={setInStockOnly} />
        // ... continued
Then, inside of the SearchBar component, we can create the onChange event handlers that set the relevant state:
<input
  type="text"
  value={filterText}
  placeholder="Search..."
  onChange={(e) => onFilterTextChange(e.target.value)} />
Just like that, the application is working in its entirety! Check out the complete demo below:
The Reactive World of React
Now, you have many of the core skills and much of the knowledge required to really put React to work building reactive applications. In the next lesson, we're going to take a deeper dive into adding interactivity to React by looking at additional examples and ways to approach various stumbling blocks you may encounter during development.