
Lesson 308H.12 - The Document Object Model
Learning Objectives
By the end of this lesson, learners should be able to:
- Use DevTools to Explore the DOM.
- Select a Single Element in the DOM.
- Select Multiple Elements in the DOM.
- Change the Content of an Element.
- Change the Style of an Element.
- Manipulate the Attributes of an Element.
- Manipulate the Classes of an Element.
- Iterate Over a Collection of Elements.
- Use the window object properties and methods.
CodeSandbox
This lesson uses CodeSandbox as one of its tools.
If you are unfamiliar with CodeSandbox, or need a refresher, please visit our reference page on CodeSandbox for instructions on:
- Creating an Account
- Making a Sandbox
- Navigating your Sandbox
- Submitting a link to your Sandbox to Canvas
The Document Object Model (DOM)
The Document Object Model (DOM) is the in-memory representation of a browser's web document, which gives us access to the webpage so that we can modify it with JavaScript. It is an interface that allows programs to dynamically access and update the content, structure, and style of a document.
Javascript provides a DOM class that defines HTML elements as objects. It support properties, methods, and events, which are available to the web developer for manipulating and creating web pages organized into objects. In the DOM, all HTML elements are defined as objects.
The DOM is represented by a tree-like data structure with the top (root) being the document object.
The DOM's application programming interface (API) enables developers to make the user interface of a web application dynamic by using JavaScript to:
- Add or remove elements to and from the document.
- Change the content of elements.
- Change the style properties of elements.
- Attach event listeners to elements.
- And more!
DOM Nodes
A node is a generic name for any type of object in the DOM hierarchy. A node in this context is simply an HTML element. A node could be one of the built-in DOM elements such as document or document.body, an HTML tag specified in the HTML such as <input> or <p>, or it could be a text node that is created by the system to hold a block of text inside another element.
Each HTML element is represented by an object. Each object has various properties and methods that correspond to the appearance or behavior of the corresponding HTML element. The object also has parent, children, and sibling nodes as specified by the DOM tree.
At the root of the tree is the Document node that represents the entire document. The nodes that represent HTML elements are Element nodes, and the nodes that represent text are Text nodes. The Document, Element, and Text are subclasses of Node. The Node interface has many important instance properties and methods that can be used to navigate and manipulate the DOM, which we will discuss later.
A Real DOM Representation
Rather than a long, boring explanation, let's look at an example to see how a real HTML snippet is converted into a DOM.
Take the following HTML code:
<p>
  Let's use:
  <span>Cascading</span>
  <span>Style</span>
  <span>Sheets</span>
</p>
In the DOM, the node corresponding to our <p> element is a parent. Its children are a text node and the three nodes corresponding to our <span> elements. The SPAN nodes are also parents, with text nodes as their children:
<p>
├─ "Let's use:"
├─ <span>
|  └─ "Cascading"
├─ <span>
|  └─ "Style"
└─ <span>
    └─ "Sheets"
Useful Document Properties and Methods
The following are some useful properties and methods of the document object. In practice, some of these are used much more frequently than others, but you should be familiar with most of them. As always in programming, reference the documentation for a concept when you are uncertain of its capabilities.
document.anchors: Returns all<a>elements that have anameattribute.document.baseURI: Returns the absolute base URI of the document.document.body: Returns the<body>element.document.cookie: Returns the document's cookie.document.doctype: Returns the document's doctype.document.documentElement: Returns the<html>element.document.documentMode: Returns the mode used by the browser.document.documentURI: Returns the URI of the document.document.domain: Returns the domain name of the document server.document.embeds: Returns all<embed>elements.document.scripts: Returns all<script>elements.document.strictErrorChecking: Returns if error checking is enforced.document.title: Returns the<title>element.document.URL: Returns the complete URL of the document.document.forms: Returns all<form>elements.document.head: Returns the<head>element.document.images: Returns all<img>elements.document.implementation: Returns the DOM implementation.document.inputEncoding: Returns the document's encoding (character set).document.lastModified: Returns the date and time the document was updated.document.links: Returns all<area>and<a>elements that have anhrefattribute.document.referrer: Returns the URI of the referrer (the linking document).
Exploring the DOM
In order to explore the DOM, let's create a basic webpage to inspect.
- Create a folder named
dom-practiceandcdinto it. - Create an
index.htmlfile and open the directory in VS Code. - In the
index.htmlfile, use the! [tab]to create the HTML boilerplate. - Make a
jsfolder and ajs/script.jsfile. - Add a
<script>tag to includescript.jsin the<head>:
<html>
	<head>
		...
		<title>DOM Practice</title>
		<script defer src="js/script.js"></script>
</head>- The
deferattribute ensures the DOM is ready before the script executes. - Finally, let's add an
<h1>inside of the<body>, as follows:
...
	<body>
		<h1 id="title" class="main-title">DOM Practice</h1>
	</body>
</html>
Note: It's a best practice to use double quotes and kebob-casing in HTML.
Using DevTools to Explore the DOM
Open your index.html file in Chrome, and then open Chrome DevTools.
- Click on the Elements tab to browse the DOM.
- To try it out, first select the
h1element and use the Styles panel to add a CSS property ofcolor: red;.

Look closely after the closing </h1> tag - you see that == $0? That tells us that Chrome has created a variable named $0 that represents the <h1> element in the DOM!
Click on the Console tab and let's explore the properties on the $0 object by typing dir($0).
Now try typing this in: $0.style.backgroundColor = 'yellow'.
You've now used JavaScript to manipulate the DOM!
Selecting DOM Elements
Web developers make web pages dynamic by manipulating the DOM.
For example, in a todo app, the user types a new todo into an input, clicks a button, and the new todo is added to the list.
The above scenario requires the app's JavaScript to:
- Attach an "event listener" to the button element.
- Grab the text entered from the
inputelement. - Create a new element, e.g. a
li, and set its content. - Append the new element to its parent element.
Devs must use JS to select the appropriate DOM elements so that the above steps can be performed, so how do we do that?
Select an Element by id
The getElementById method is the most efficient way to select a DOM element if it has an id assigned to it.
let titleEl = document.getElementById('title');
console.log(titleEl);
Note that, unlike in CSS, we do not put a
#in front of theidwhen usinggetElementById.
If you'd like to be able to explore the properties of element, use console.dir() instead.
You can also use getElementByName for nodes with a name attribute, but since there can be multiple elements with the same name, like radio buttons or checkboxes in forms, getElementByName will return a NodeList object that acts as an array of elements in the case of multiple matches. We'll cover NodeList shortly.
But what if the element doesn't have an id or name?
Select an Element using a CSS Selector
The querySelector(selector) method that is available on the document object (and elements themselves) allows us to use CSS selectors to select DOM elements.
- The selector argument is a string that follows the rules of regular CSS3 selectors.
- If the CSS selector provided to
querySelector()matches multiple elements, it returns the "first" matching element. If no matching node is found,nullis returned. - The CSS3 selector language offers amazing power to target elements for selection!
Knowing that the selector provided to
querySelector(selector)follows the rules of CSS3 selectors, how could we modify our code to select our<h1>element by itsid?
Exercise
Try the following:
- In
index.html, add a<p>tag below the<h1>and give it a class ofcool. - Add some content inside of the
<p>tag. Try typinglorem [tab]to emit (using emmet) random lorem ipsum text. - Use
querySelector()to select the first element with a class ofcooland assign it to a variable namedpEl. - Verify that the
<p>element was selected by loggingpEl.
Selecting Multiple Elements
Before we explore selecting multiple elements, let's add the following HTML below the existing <p> element:
<ul id="comments">
	<li class="comment">first comment</li>
	<li class="comment">second comment</li>
	<li class="comment">third comment</li>
</ul>
VS Code includes Emmet, which is a great tool for quickly generating markup. Type the following to generate most of the markup above:
ul#comments>li.comment{comment}*3
The following methods can be used to select multiple elements:
getElementsByTagName(namesString)getElementsByClassName(namesString)
These methods return a live HTMLCollection. A live collection means that the list is automatically updated as the DOM is updated. This can be useful or dangerous, depending on your desired implementation.
Although it's pretty cool that the returned list is automatically updated to include/exclude DOM elements as the DOM is updated, the above methods are not as flexible as the querySelectorAll method.
- Like
querySelector, thequerySelectorAll(selector)method uses the power of CSS3 selectors to specify which DOM elements we want returned. - Of course, like the name says, it selects all DOM elements that match the selector.
- By itself,
querySelectorAllactually provides all the DOM selection power a web dev needs!
Exercise
Try the following:
- Use
querySelectorAllto select all of the elements with a class ofcommentand assign to a variable namedcommentEls. console.log(commentEls)to verify it worked.
Selecting Specific Tags
You can also use the getElementsByTagName() method to access a NodeList of all elements in the document with the specified tag name.
For example, if you wanted all <li> elements in the document, you could use:
let li = document.getElementsByTagName('li');Iterating over a Collection of Elements
Methods that return multiple elements do so by returning an array-like object called a NodeList.
There are three approaches we can use to iterate over the elements in a NodeList :
- A regular
forloop works, but is not as readable or elegant. - The
forEachmethod is a good option when you want to iterate through all elements and also want to access the index of the iteration. - A
for ofloop is elegant and allows early exit of the loop with thebreakstatement; however, it does not have access to an index (although you could track indexes manually by initializing a separate variable before the loop and incrementing it within the loop).
Let's type this for...of loop in the console to log each element:
for(let commentEl of commentEls) {
	console.log(commentEl);
}
It is important to note that, while NodeList and HTMLCollection are similar to arrays in many ways, you cannot invoke Array methods directly on them.
In order to use Array class methods on a NodeList or HTMLCollection, call them indirectly like so:
let li = document.getElementsByTagName('li');

let myArray = Array.prototype.slice.call(li, 1, 3);
Exercise
Try the following:
- Add a
for...ofloop toscript.jsthat changes the font size all of the comment elements to30px. - Hint: You must use a string like
'30px'(just the number30or the string of'30'will not work).
Navigating Between Elements
The nodes in the DOM are referred to as parents, children, and siblings depending on their relation to other nodes. The Node interface includes properties for navigating between nodes to retrieve their family members:
parentNodechildNodes[node-number]firstChildlastChildnextSiblingpreviousSibling
Each of these properties accesses a node in the family tree as shown in the example below.
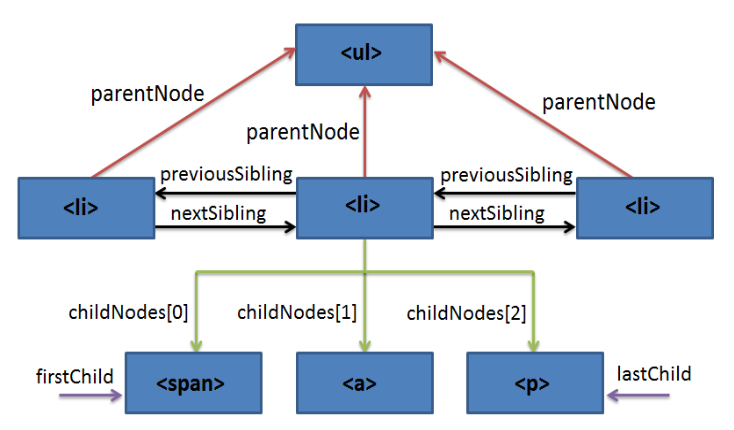
In this way, you can traverse the DOM by moving between parent, child, and sibling nodes. This becomes particularly useful when attempting to manipulate the DOM in various ways, as we will explore in the next sections.
Exercise
Try the following:
- Select the element with
id"comments." - Log the first and last child element within "comments."
- Go to the parent node of "comments" and log its siblings.
Knowledge Check
❓ What method is the most efficient for selecting an element that has an id?
❓ If you had to pick only one method to select DOM elements with during your career as a developer, which one should you choose?
❓ How do you call Array methods on NodeList objects?
❓ What are two properties used to navigate between elements in the "family tree"?
Creating Elements
Individual HTML elements can be created with the createElement method of the document object. This method accepts a string parameter that specifies what type of element to create.
const div = document.createElement("div");
const list = document.createElement("ul");
const listItem = document.createElement("li");
Adding Elements to the DOM
However, creating elements does not add them to the DOM. In order to do so, we need to use a combination of selectors and Node instance methods. For example, if we wanted to add a new <li> to the end of our existing "comments" <ul>, we could use the appendChild method:
const commentList = document.getElementById("comments");
const listItem = document.createElement("li");

commentList.appendChild(listItem);
If the given child is a reference to an existing node in the document, appendChild moves it from its current position to the new position — there is no requirement to remove the node from its parent node before appending it to some other node. This means that a node can't be in two points of the document simultaneously.
Another option is the insertBefore method, which requires both the node to be inserted and the node that it will be inserted before. For example, if we wanted to instead insert our new list item at the beginning of the list:
const commentList = document.getElementById("comments");
const listItem = document.createElement("li");

commentList.insertBefore(listItem, commentList.firstChild);
There is another option for adding elements to the beginning of a child list: Element.prepend(). Note that prepend is a method of the Element object, not Node, and as such only works on Elements. The prepend method does not have the same flexibility as insertBefore, but it simplifies the task of adding elements to the beginning of a child list.
You can prepend elements, text, or both simultaneously.
const commentList = document.getElementById("comments");
const listItem = document.createElement("li");

commentList.prepend(listItem);
Exercise
Try the following:
- Build a simple HTML layout using JavaScript to create and add the elements to the DOM, such that your page structure looks like:
<body>
	<div>
		<ol>
			<li></li>
			<li></li>
			<li></li>
		</ol>
	</div>
	<div>
		<ul>
			<li></li>
			<li></li>
			<li></li>
		</ul>
	</div>
</body>
Removing Elements from the DOM
You can also remove DOM elements in a number of ways, including by replacing it with a new node.
The removeChild method removes a child node from the node that it is called on. It returns the removed node, which will remain in memory and can be used, but is no longer part of the DOM. If the return value is not stored, it will be automatically deleted.
The following block of code shows how to remove all child nodes from a parent using this method.
while (parent.firstChild) {
	parent.removeChild(parent.firstChild);
}
You can also replace a node with a different one using replaceChild, effectively removing the first node from the DOM. If the new child node already exists elsewhere in the DOM, it will be moved to the new location (just like with appendChild and insertBefore).
This example replaces the first child in the list with a new <li> element.
const commentList = document.getElementById("comments");
const listItem = document.createElement("li");

commentList.replaceChild(listItem, commentList.firstChild);
As with removeChild, if the replaced element is not stored somewhere for later use, it will be deleted and its contents lost.
Changing the Content of an Element
Now that we're able to select an element of our choosing, let's see how we can change the content of that element.
By inspecting the properties of a DOM element in the console, we will find a couple of properties that we can use to read and set its content:
innerHTML- Used to retrieve/set content as HTML.textContent- Used to retrieve/set content as plain text.
Let's check out changing the content of the <p> element by assigning the string Comments for <strong>Today</strong> first to textContent, then to innerHTML.
As you will see, if you want to include HTML in the content you must use innerHTML.
- The power of
innerHTMLmay not be obvious, but consider the string can be as complex as you want - containing multiple elements with attributes, etc. - Using
textContentis more efficient when just setting text.
Changing the Style of an Element
DOM elements have a style property that can be used to set CSS styling!
Check out the CSS properties in the console:
- What naming convention is used for CSS properties in the DOM?
- What naming convention is used for CSS properties in CSS?
- Why is it different?
This is how we can set the text-align CSS property of our title:
let titleEl = document.getElementById('title');
titleEl.style.textAlign = 'center';
Exercise
Try the following:
- Change the
colorof the<p>element to a color of your choosing using JavaScript.
Attributes of an Element
You may need to get, set, or check if an element has a certain attribute.
Here are a few of the methods that the Element API has for working with an element's attributes:
getAttribute(name)setAttribute(name, value)hasAttribute(name)
Exercise
Try the following:
- Add an
<a>tag toindex.htmlwith content of "Visit Google" but without anhrefattribute. - Reload the page and verify that the link does not work (in fact, it probably doesn't even look like a link).
- In the JS, write the line of code that will add an
hrefattribute that will make the link navigate to "https://www.google.com".
Class Attributes
Technically, you could use those attribute methods we saw to work with an element's classes.
However, the classList property offers a better approach. It's an object with the following methods pertaining to classes:
add(className, className, ...)remove(className, className, ...)toggle(className)contains(className)replace(oldClass, newClass)
Here are some basic examples from the MDN documentation on classList:
const div = document.createElement("div");
div.className = "foo";

// our starting state: <div class="foo"></div>
console.log(div.outerHTML);

// use the classList API to remove and add classes
div.classList.remove("foo");
div.classList.add("anotherclass");

// <div class="anotherclass"></div>
console.log(div.outerHTML);

// if visible is set remove it, otherwise add it
div.classList.toggle("visible");

// add/remove visible, depending on test conditional, i less than 10
div.classList.toggle("visible", i < 10);

console.log(div.classList.contains("foo"));

// add or remove multiple classes
div.classList.add("foo", "bar", "baz");
div.classList.remove("foo", "bar", "baz");

// add or remove multiple classes using spread syntax
const cls = ["foo", "bar"];
div.classList.add(...cls);
div.classList.remove(...cls);

// replace class "foo" with class "bar"
div.classList.replace("foo", "bar");
Knowledge Check
❓ How do you create a new HTML element using JavaScript?
❓ What methods could be used to add an element to an existing DOM object?
❓ What is the method for removing an element from its parent node?
❓ If we want to change the text (no HTML) inside of a <div>, what property should we set?
❓ What DOM element property is used to style a DOM element?
❓ If we want to insert content in an element that includes markup, what property would we assign to?
❓ What are some of the methods of the classList object?
Practicing DOM Manipulation
We're going to take a break from this lesson to complete R-ALAB 308H.12.1 - DOM Manipulation (Part One), which will give us some practice using JavaScript to manipulate the DOM.
Afterwards, we'll continue by covering more advanced ways of creating new HTML content using JavaScript.
Do not yet attempt to complete Part Two, as it covers event handling, which we will discuss later in this lesson.
DocumentFragment and Nested Structures
The DocumentFragment interface represents a document object with no parent. It is a lightweight version of the Document interface, comprised of nodes and elements just like a standard document would be. Since the document fragment isn't a part of the active document structure, changes made to it don't affect the document.
Since changes to the fragment don't affect the live view of the document, using fragments can result in better performance. This makes document fragments useful tools for creating more complex DOM subtrees before inserting the entire tree into the live DOM.
As an example, let's look at two implementations of list creation using DocumentFragment:
const frag = document.createDocumentFragment();

const li = frag
	.appendChild(document.createElement("div"))
	.appendChild(document.createElement("ul"))
	.appendChild(document.createElement("li"));

li.textContent = "Successful Subtree Creation!";

document.body.appendChild(frag);
The script above creates the following DOM tree within <body>:
<div>
  <ul>
    <li>"Successful Subtree Creation!"</li>
  </ul>
</div>
We can also use fragments to loop through values and create DOM trees:
const ul = document.querySelector("ul");
const fruits = ["Apple", "Orange", "Banana", "Melon"];

const fragment = new DocumentFragment();

for (const fruit of fruits) {
  const li = document.createElement("li");
  li.textContent = fruit;
  fragment.append(li);
}

ul.append(fragment);
What will the output of this code look like?
The performance implications of DocumentFragment are substantial in some cases, but modern browser technologies have closed the gap between DocumentFragment and alternatives like appending directly to the DOM in real time.
Take a moment among the class to look through the examples within this CodeSandbox, which demonstrates the performance differences between three methods of appending a long list of 500 elements to a document. Within these functions, try changing innerText to innerHTML or textContent and note the differences.
Performance optimization as a topic is outside of the scope of this lesson, but in general, analyze your code to ensure there are no obvious glaring inefficiencies, and always test test test.
Using these methods, you can create very complex nested DOM structures and store the important nodes as variables for further manipulation. As the DOM tree grows in complexity, however, there is an even more convenient solution that can be applied.
Templates and Clones
The HTML Template element provides a way to create HTML that is not immediately rendered to the DOM. These templates can then be cloned, manipulated, and appended to the document.
The <template> elements have a JavaScript content property, which is a read-only DocumentFragment containing the DOM subtree which the template represents.
The cloneNode method returns a duplicate of the node on which it is called, taking an optional boolean parameter which specifies whether a deep copy should be performed. The cloneNode method does not copy any event listeners attached to the node.
Consider the following HTML table and row template, taken from the MDN reference on templates:
<table id="producttable">
  <thead>
    <tr>
      <td>UPC_Code</td>
      <td>Product_Name</td>
    </tr>
  </thead>
  <tbody>
    <!-- existing data could optionally be included here -->
  </tbody>
</table>

<template id="productrow">
  <tr>
    <td class="record"></td>
    <td></td>
  </tr>
</template>
Each row of the table can then be constructed using JavaScript:
// Test to see if the browser supports the HTML template element by checking
// for the presence of the template element's content attribute.
if ('content' in document.createElement('template')) {
    // Instantiate the table with the existing HTML tbody
    // and the row with the template
    const tbody = document.querySelector("tbody");
    const template = document.querySelector('#productrow');

    // Clone the new row and insert it into the table
    const clone = template.content.cloneNode(true);
    let td = clone.querySelectorAll("td");
    td[0].textContent = "1235646565";
    td[1].textContent = "Stuff";

    tbody.appendChild(clone);

    // Clone the new row and insert it into the table
    const clone2 = template.content.cloneNode(true);
    td = clone2.querySelectorAll("td");
    td[0].textContent = "0384928528";
    td[1].textContent = "Acme Kidney Beans 2";

    tbody.appendChild(clone2);

} else {
  // Find another way to add the rows to the table because
  // the HTML template element is not supported.
}
It is important to note that DocumentFragment instances are not valid targets for most events. There are workarounds for this within the <template> documentation.
Templating and dynamic creation of individual DOM components becomes a much more streamlined task when using a front-end framework like React, Vue, or Angular, but understanding the fundamentals will help you excel as you move forward in web development.
The Browser Object Model
Like the DOM is a group of objects used to interact with the Document, the Browser Object Model (BOM) is a group of objects used to interact with the browser. The BOM provides access to the characteristics of a browser (i.e. browser window, screen characteristics, browser history etc.).
We will provide a short overview of the key BOM objects. It is important to be familiar with the existance and usage of these objects, but you may use them infrequently in production evironments.
The window object, as the default object, provides access to the methods in the BOM directly or indirectly. Even the document object model (DOM) is a property of the window object. It is important to note that there are no official standards for the BOM, but almost all modern browsers have implemented the same methods for interactivity. The window object is supported by all browsers.
All global JavaScript objects, functions, and variables automatically become members of the window object. Global variables are properties of the window object, and global functions are methods of the window object.
For example: window.document.getElementById("header") is the same as document.getElementById("header");.
If a document contains frames (<iframe> tags), the browser creates one window object for the HTML document, and one additional window object for each frame.
In addition to the document object, the window object contains location, history, screen, and navigator objects that each have useful properties and methods, which we will discuss.
Getting Information about the Window
The basic function of the window object is to get information about the actual browsing window. To do so, it allows us access to many properties:
closed- Returns true if window is closed.defaultStatus- Set the text on the status bar.innerHeight- The inner height of the page (not including toolbar, other tabs, etc).innerWidth- The inner width (excludes toolbar, other tabs, etc.).outerHeight- The outer height of a window (including toolbar, other tabs, etc).outerWidth- The outer width of a window.location- The window's current URL.name- Name of the window.parent- Reference to the window that the current window came from.pageXOffset- The number of pixels user has scrolled horizontally from the upper-left corner of document.pageYOffset- The number of pixels the user has been scrolled vertically.screenX- Horizontal coordinate of the window relative to the screen.screenY- Vertical coordinate of the window relative to the screen.top- The top-most parent window.
It also includes many methods to allow us to manipulate the window in various ways:
window.alert()- Opens an alert message box and displays a text string.window.prompt()- Opens a prompt message box and returns entered value.window.confirm()- Opens a confirm message box and returns true or false.window.open()- Opens a secondary window.window.focus()- Brings focus to a window. When working with secondary windows, brings the window to the foreground.window.blur()- Removes focus from a window. When working with secondary windows, moves the window to the background.window.close()- Closes an open window.window.print()- Presents the print dialog box to print the window contents.window.scroll()- Scrolls the document to the specified coordinates.window.stop()- Stops the document from loading.
While we will not be covering the syntax for each of these methods in detail, here is an example of using the open and close methods to create a popup window. Copy this code into an HTML file, open it, and give it a test.
<!DOCTYPE html>
<html>
	<head></head>
	<body>
		<p>Click the buttons below</p>
		<button type="button" onclick="newWindow()">Open New Window</button>
		<button type="button" onclick="closeWindow()"> Close Window!</button>
		<script>
			var myWindow;
			function newWindow() {
				myWindow = window.open("https://perscholas.org/", "perscholas", "width=800, height=400, resizable=yes, scrollbars=yes, location=yes");
				myWindow.focus();
			}
				function closeWindow(){
				myWindow.close();
			}
		</script>
	</body>
</html>
Be sure to research the options available to you within the MDN documentation on the Window interface when faced with challenges that window might be able to solve.
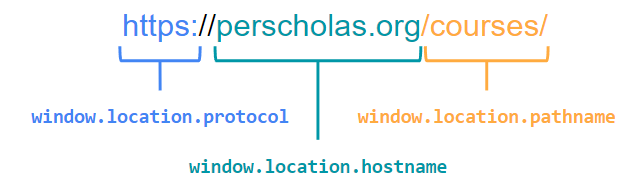
The Location Object
The location object stores properties that hold information related to the current URL:
| Property | Description | Example |
|---|---|---|
| hash | The URL hash, the anchor part. | "#myData" |
| host | The server name and port number. | www.perscholas.org:8080 |
| hostname | Server name without the port number. | www.perscholas.org |
| href | The full URL of the page currently loaded. | https://perscholas.org/ |
| pathname | The directory and filename of the URL. | "/JavaScript/" |
| port | The port number. | "8080" |
| protocol | The protocol currently in use. | "https:" |
| search | The query string of the URL, beginning with a question mark. | "?q=courses" |
The Screen Object
Although most information about the user’s system is hidden for security reasons, it is possible to get a certain amount of information about the user’s monitor using the screen object. It provides information such as width, height, color-depth, display, number of pixels available, etc. These properties can be used with the window object’s methods to set the size and position of the browser window.
screen.availHeight– Returns the height of the screen, in pixels, minus permanent or semi-permanent user interface features displayed by the operating system such as the taskbar.screen.availWidth– Returns the amount of horizontal space in pixels available to the window.screen.colorDepth– Returns the color depth of the screen.screen.height– Returns the height of the screen in pixels.screen.width– Returns the width of the screen in pixels.
Use the provided screen-object.html example file to see some of these properties in action.
The History Object
The window.history object contains the browser’s history. You can load previous history or forward to a particular page. For security reasons, scripts cannot access the URLs in this data; instead, the history object provides methods to navigate between them.
back()- To go one step back in the history.forward()- To go one step forward in the history.go(<index>)- To go the specified position in the history relative to the current document.length- To return the number of items in the browser history.pushState(<state>, <title>, <url>)- To push (add) an entry in a stack to the browser history.replace(<state>, <title>, <url>)- To replace the current entry in the browser history.state- Returns state data associated with the current document in the browser's history.
Here is a very simple example of how to implement these methods:
<button id="back">back</button>
<button id="forward">forward</button>
<button>Go</button>
<script>
    const buttons = document.querySelectorAll("button");
    buttons.forEach((function (e) {
        e.onclick = handleButtonPress;
    }))
    function handleButtonPress(e) {
        if (e.target.id === "back") {
            window.history.back();
        } else if (e.target.id === "forward") {
            window.history.forward();
        } else {
            window.history.go(-1);
        }
    }
</script>
The Navigator Object
The navigator object has properties related to the browser being used to view a webpage. It contains all information related to the browser, such as vendor, version, plugins, etc.
appCodeName- Returns the code name of the browser.appName- Returns the name of the browser.appVersion- Returns the specifics of the version of the browser.mimeTypes- Returns the array of MIME types (only in some browsers).platforms- The operating system on which the browser runs; returns the platform (e.g. Win32).userAgent- The HTTP user-agent header sent from the browser to the server.plugins- Returns the plugins (only in some browsers).
One of the useful properties of the navigator object is the userAgent property, which can be used to determine the general capabilities of a client's browser. When using JavaScript code, there is the risk that visitors with older or incompatible browsers will not be able to view page content generated by scripts. We can combine the userAgent property and the indexOf() method to determine whether the visitor is using a browser that is compatible with the application.
Knowledge Check
❓ What is the object at the top of the Browser Object Model Hierarchy?
❓ Which property returns the interior width of the window in pixels?
❓ Which window method opens an alert message box and displays a text string?
❓ Which window method opens a text box that allows for user input?
❓ Which window method opens a new browser or secondary window?
❓ Which object gives you information about the current URL?
❓ Which object gives you information about the available dimensions for a window?
❓ Which object allows you to go to a previous web page?
❓ Which object contains information about the user’s browser?
BOM Summary
The BOM provides access to the characteristics of a browser (e.g., browser window, screen characteristics, browser history, etc.).
The window object, which is supported by all browsers, provides access to the BOM. All global JavaScript objects, functions, and variables are members of the window object.
The window object also has properties that describe the browser, such as innerWidth and innerHeight, which describe the dimensions of the window. Direct methods of the window object can allow you to do things such as alert the user to something via a message box, prompt the user for input, open and close windows, and more.
Within the BOM hierarchy, the window object has direct child objects called location, history, screen, navigator, and document. Each of these objects provides properties and methods for different parts of the browser.
- The
locationobject provides information about the current URL. - The
historyobject stores browsing history and can be used to navigate between pages. - The
screenobject has properties related to the user’s screen. - The
navigatorobject contains information about the user’s browser. - The
documentobject contains the Document Object Model (DOM).